I’ve had the idea to combine a Kunstkopf with a 3D camera for quite some time, but it took the Great Plague of 2020 to make it all come together.
A “Kunstkopf,” (literally “art-head”) is a binaural sound recording device made by putting two microphones inside a mannequin head with realistically-shaped ears. The goal is to reproduce a recording that, when played back on headphones, recreates the sounds one would hear with REAL ears. They are used to record classical music, mostly. I figured a binaural soundtrack plus a 3D picture track would combine to form a first-person “experience” that could be delivered to the viewer/listener. The device would be a “witness” to certain actualities, and would record them as accurately as possible for those who could not be there. And right now, that means you.
THE RESULTS
It makes more sense to show you what’s been done first, and then to describe how it was done – in case you’re not as interested in the backstory. Suffice to say that I built the Witness Head, and that I have three recordings for you to consider.
I thought that while you are sheltering in place and unable to travel, that maybe you’d like to visit my fair city of Los Angeles, and that the Witness Head would be a good way to bring you the sights and sounds. I also thought that maybe a quiet, meditative, slow, but immersive experience might be the kind of “entertainment” you could use. Because I’ve been worried about you lately.
These videos have been rendered in both ANAGLYPHIC and SIDE-BY-SIDE 3D with binaural sound. To get the most out of the sound you need to listen on headphones. To see the 3D, use any standard set of red-blue 3D glasses to watch the anaglyphic versions. For side-by-side 3D you can watch using a phone and one of those super-inexpensive “VR” headsets.
For the best experience, you should use over-the-ear headphones, not earbuds or airpods. Sit as far back from your screen as you can (if not using a “VR” style headset) but not so far that the screen does not give you a view like looking through a window. Darken the room and gather pets if they are the comforting sort.
THE BEACH
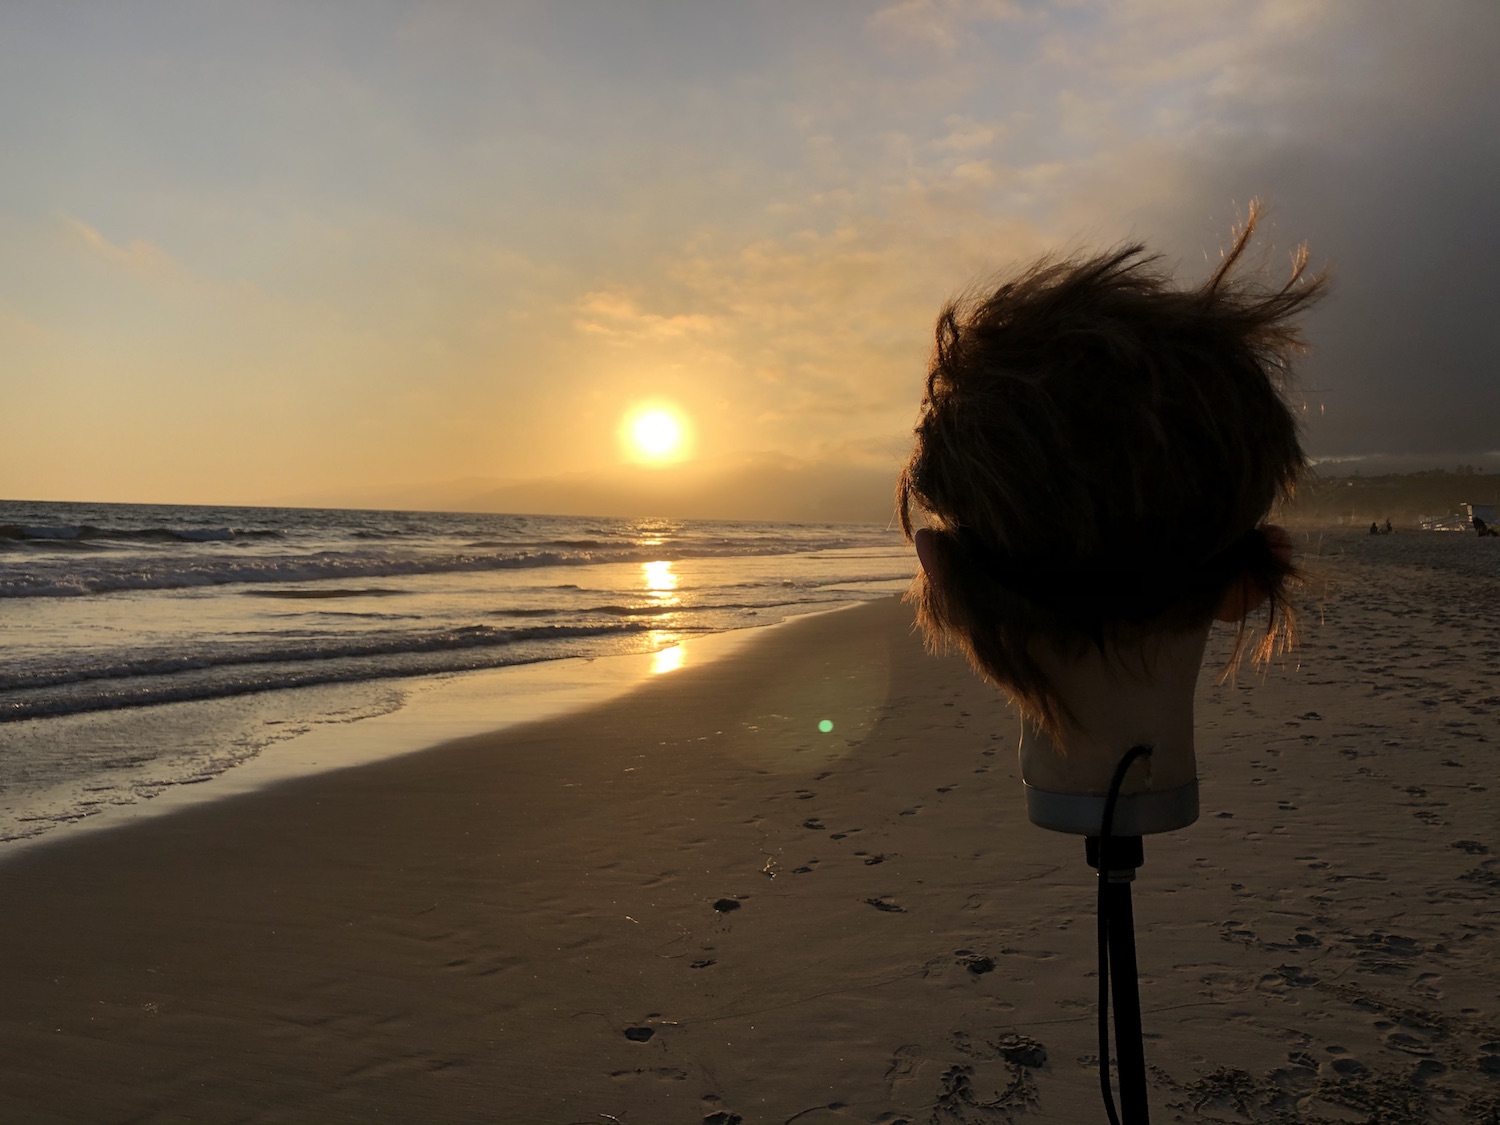
Watch in either Red-Blue Anaglyphic 3D or Side-by-Side 3D
I took the Witness Head out to the Pacific Ocean, to watch the sunset. The first trial was a bomb – the Right Eye camera backfocus was off, and the entire picture was blurred. I do not go to the beach often enough to know that the sun would fall behind this mountain. By the time I set up, it had sunk below the silhouette.
So, next day I returned, and captured the entire thing. Watch, and listen on headphones, and you, too, can see the sun sink slowly below the horizon and hear the calming Voice of the Surf. And you can also hear some annoying teenagers, but that’s what makes it so REAL.
THE MOUNTAIN
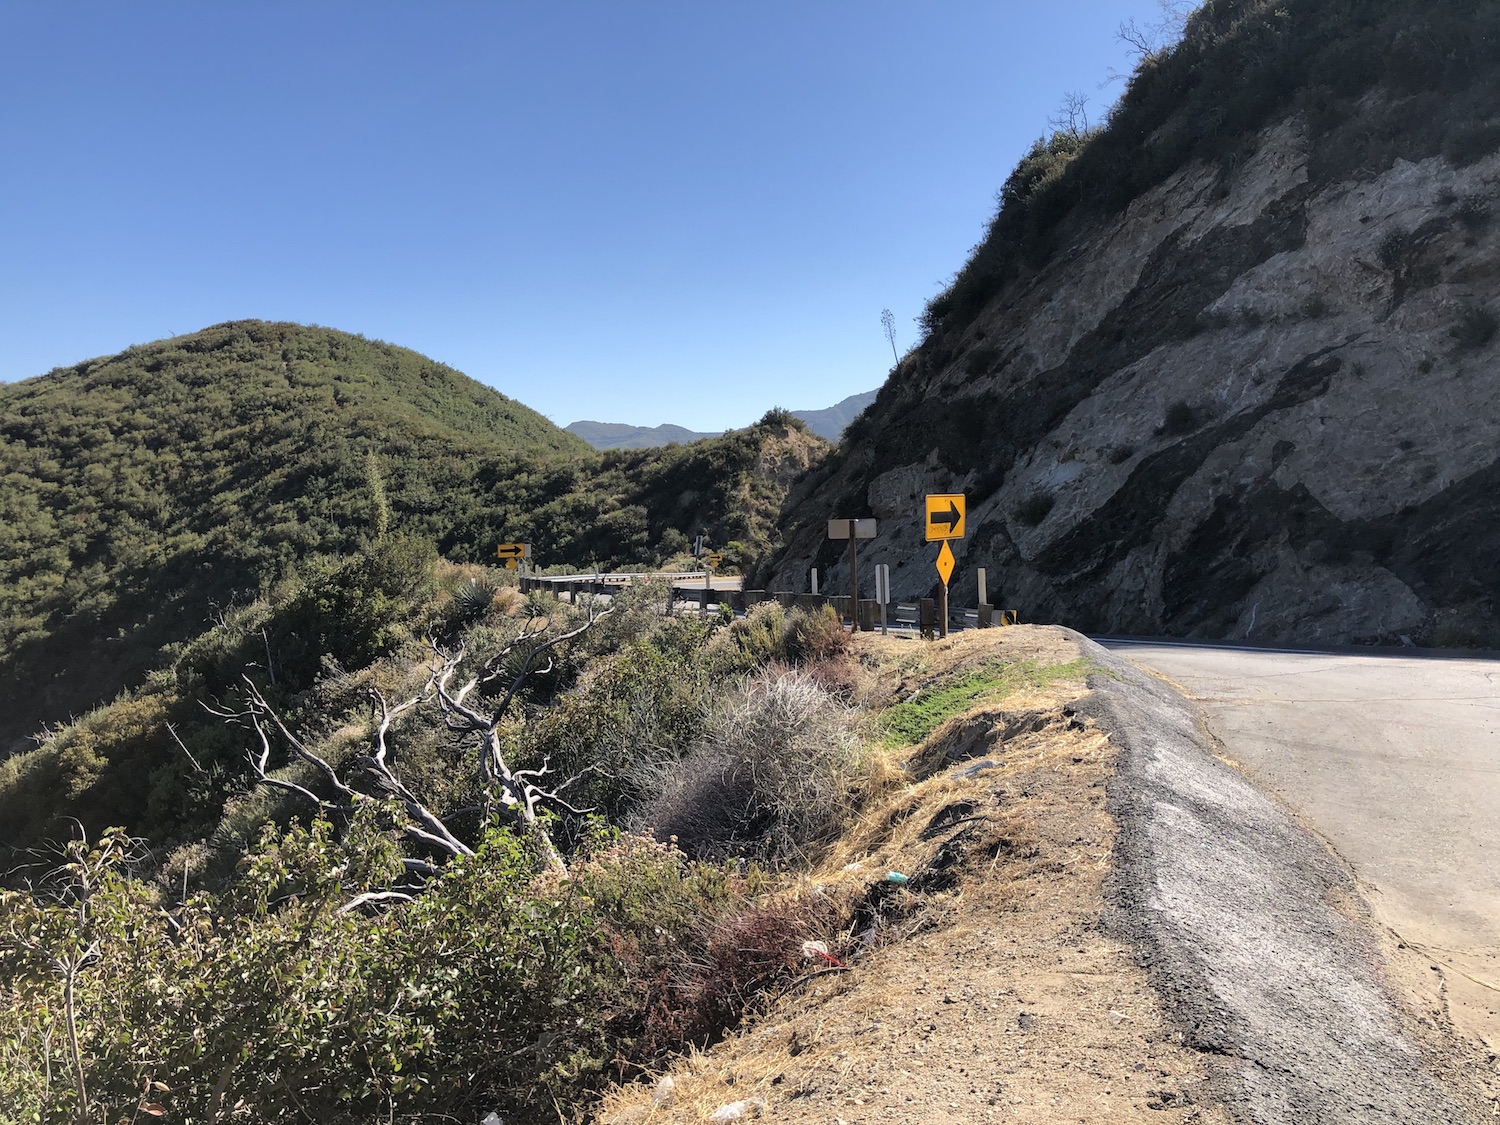
Watch in either Red-Blue Anaglyphic 3D or Side-by-Side 3D
The lovely thing about my city is that you can go from beach to mountains in less than an hour. When I did just that, I found a view so serene and quiet that the video was incredibly dull. Zen contemplation is one thing, but this was marginally more bandwidth than a photo.
On the way to the car I realized that the view you needed was this one: looking back at the Angeles Crest Highway, watching idiots careen around the corners at unsafe speeds. How perfect! There are moments of quiet – birds chirping, a fly buzzing by your ear – violently disrupted by engines spewing fumes. Where are they going? What emergency can they possibly think is going on?
This is precisely the road I traveled on a week prior to this shoot in order to see comet NEOWISE in the night sky. My cameras are not sensitive enough to catch a 3D view of the comet. You’ll have to settle for the Mitsubishi Eclipse and the Chevy Astro.
Somehow the contemplation of this view gets at the heart of L.A.’s contradictory nature – a ribbon of loud stupidity cutting a tight swath through a beautiful landscape.
DOWNTOWN
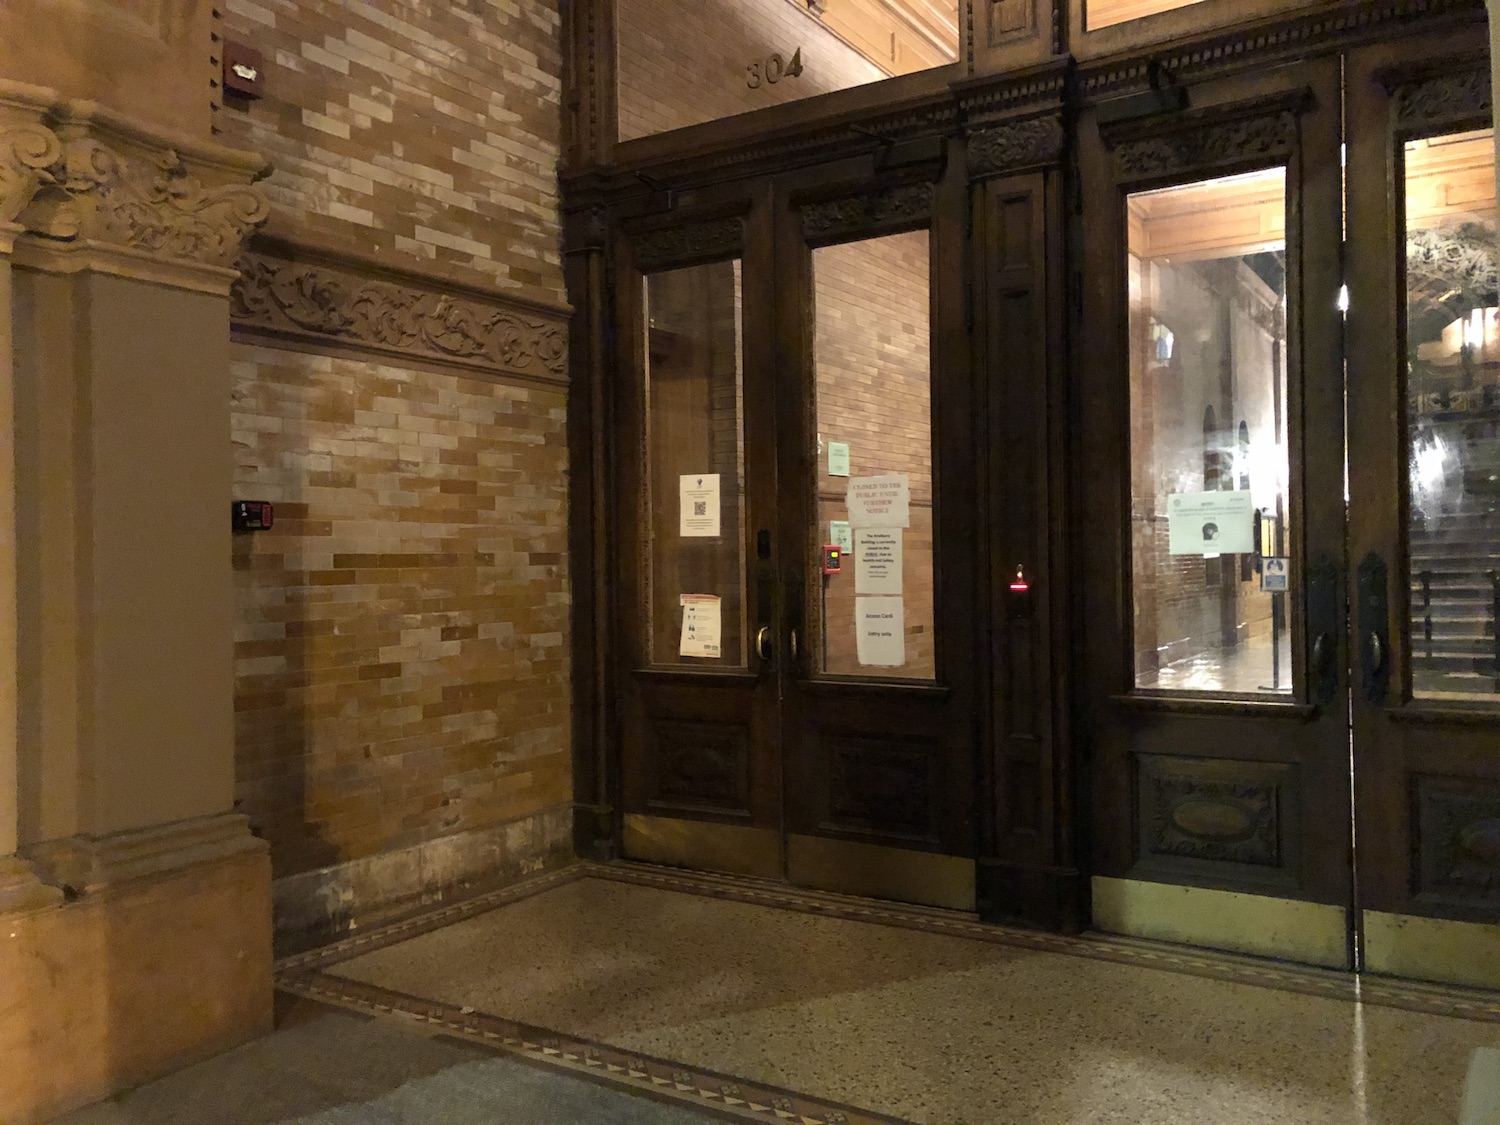
Watch in either Red-Blue Anaglyphic 3D or Side-by-Side 3D
After sundown I took the Head into the city for a night view of the splendor, the ruin, and the wonder of L.A.’s downtown. And not just any view. We are on Broadway at 3rd street, right in front of the historic Bradbury Building.
You may have seen the interior of this famous location in a great number of movies, but as it was after dark, and because access to the building is closed, I selected a famous outdoor view you might recognize. In the 1982 science fiction film “Blade Runner,” Daryl Hannah hides in this alcove waiting for William Sanderson to come home. The Million Dollar Theatre is across the street, now advertising “Donut Man” because it’s been closed for renovation. Those twisty columns aren’t here; they were just for the movie.
We’re here in July of 2020, which would be six months or so after the events in “Blade Runner,” which took place in November 2019. We have arrived far too late for everyone. Even so, there is a lot to see here, and a lot you can hear outside the frame.
CONSTRUCTION
If you’ve lasted this far, then you must be interested in the details about how this all came to be.
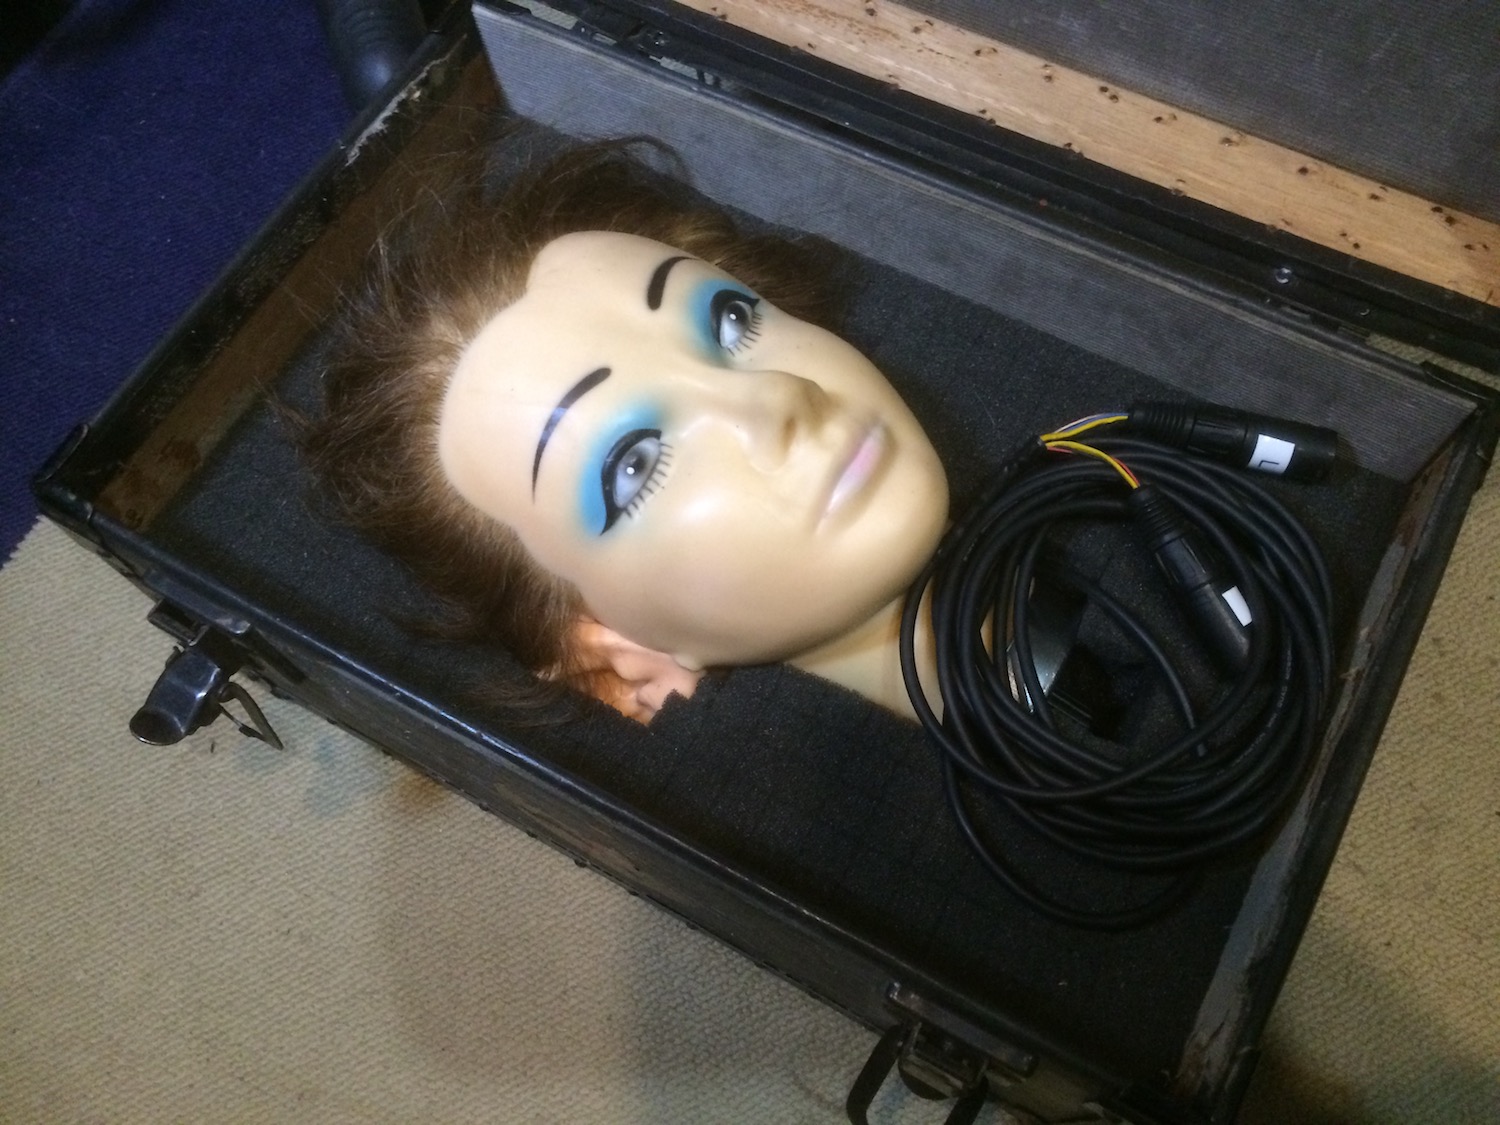
It begins with the mannequin head, which used to belong to my longtime friend and conspirator, the famously insane self-described “Sick Puppy,” a.k.a. “Wildman” Lerman, now prematurely deceased from COVID-19.
He had used this mannequin head when he was in cosmetology school (another long story – with Wildman they were all long stories), and, having given it possibly the worst haircut that I know of, he disposed of it in my good care. I kept it for over 20 years not knowing what to do with it.
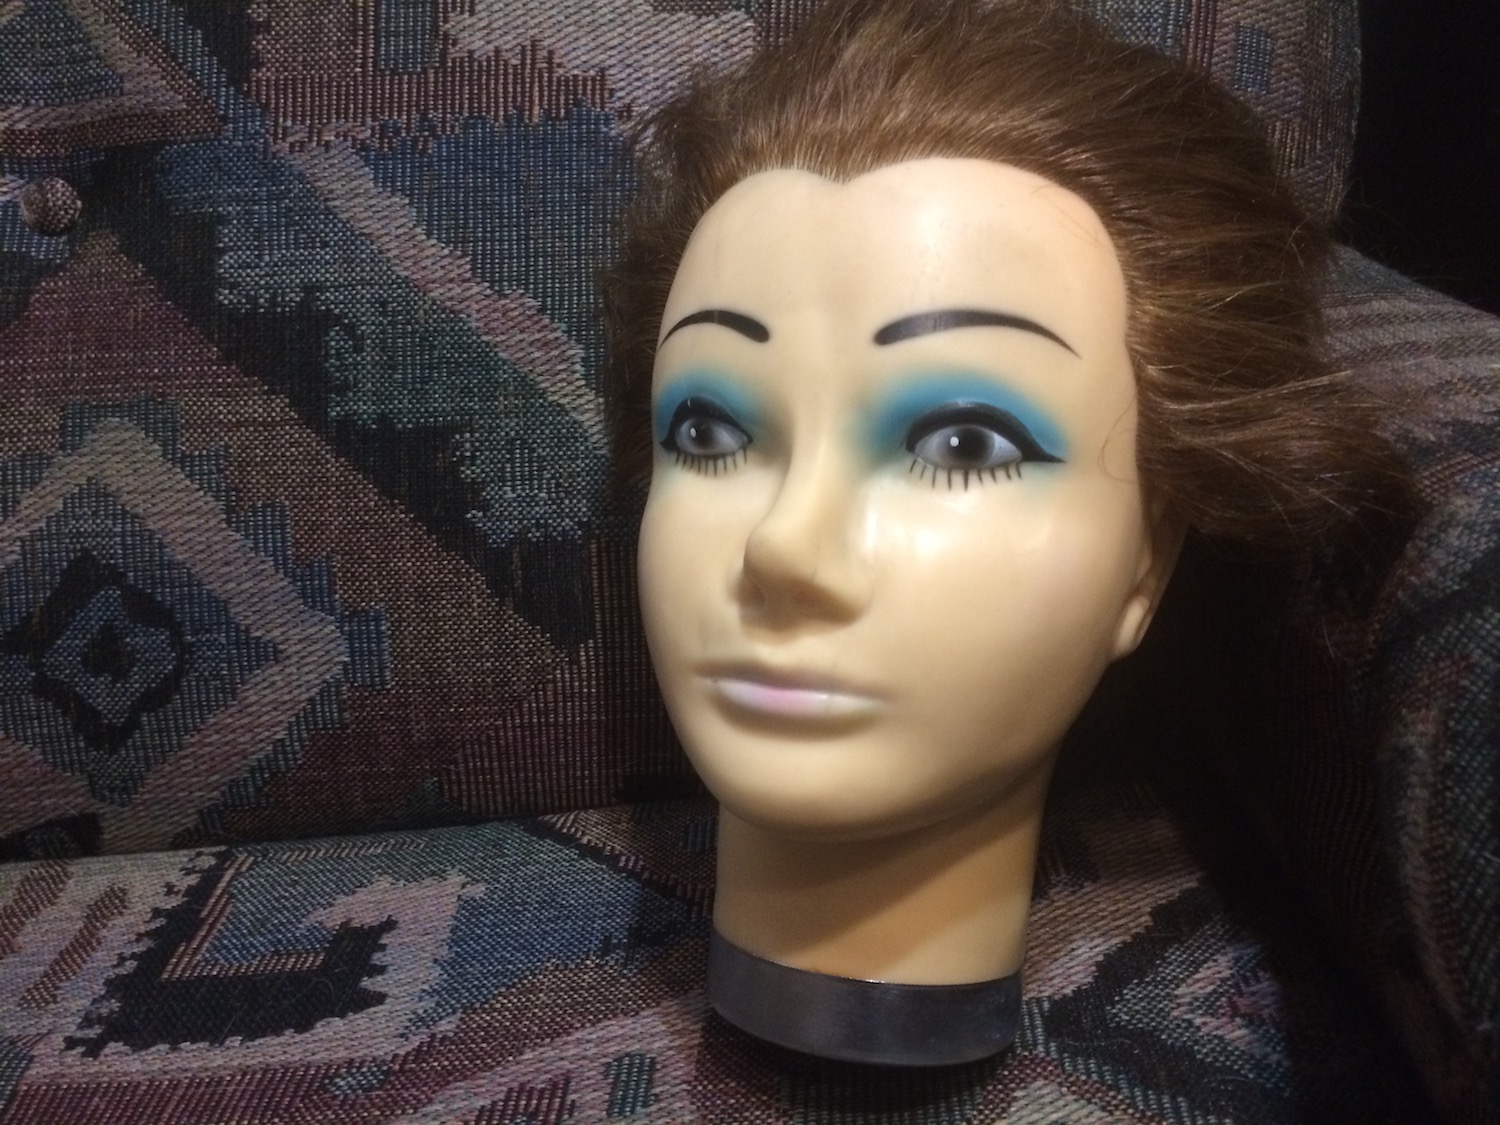
It makes a brief appearance in my own short film “Big Dong,” at the apex of a fake “body” that gets thrown over a bridge and driven over, and it may have scared some children as part of a Halloween display a couple years in a row. It remained a valuable item that I could neither place nor part with.
But one day I found a pair of very realistic silicon ears. They are sold as practice ears for acupuncturists, and can be had for very reasonable prices from online Chinese sellers.
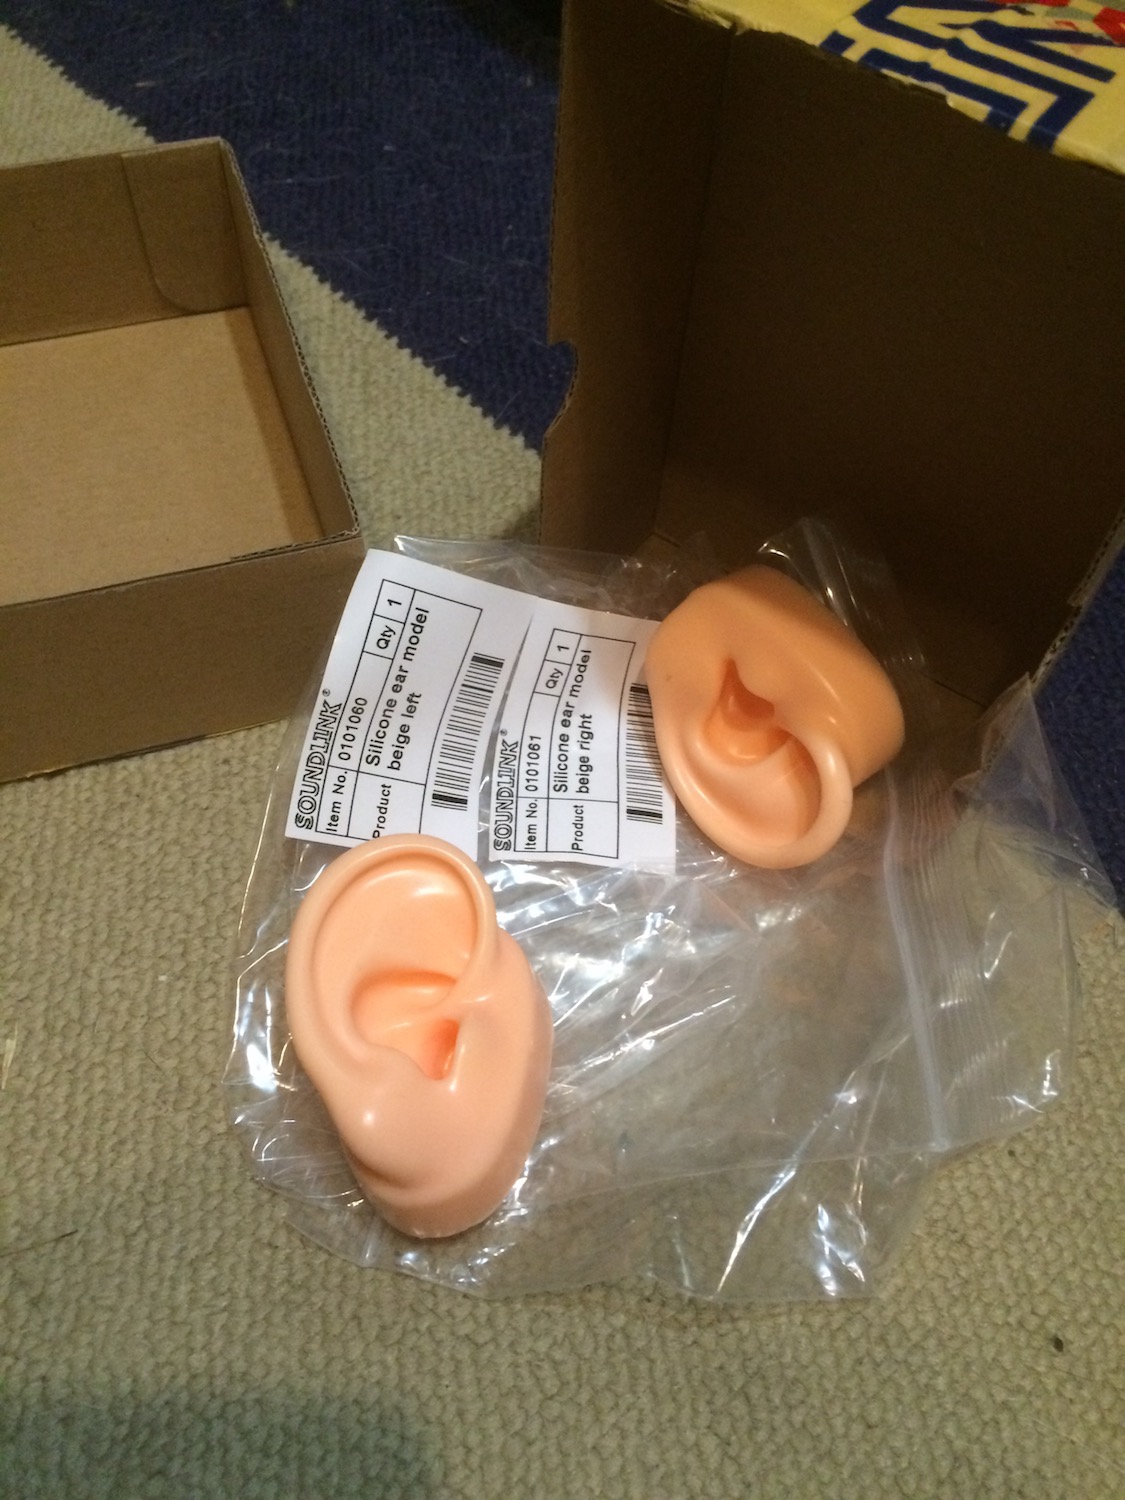
I had wanted a binaural head for some time, and a small part of my brain had always figured Wildman’s practice head could be the basis of one. Seeing these silicon ears put it all together.
The next step was to connect microphones to the head. Prior to building the Head I was interested in the *SpHEAR Project, Fernando Lopez-Lezcano’s DIY ambisonics mic project at Stanford’s CCRMA. The *SpHEAR is a tetramic with four elements, made for recording sound fields. I have built a *SpHEAR, but am remiss on the calibration, which is why I have not written that up yet. Suffice to say it works great,
Using leftover parts from the *SpHEAR, I cobbled together two additional preamps and two mic elements I had rejected for that project.
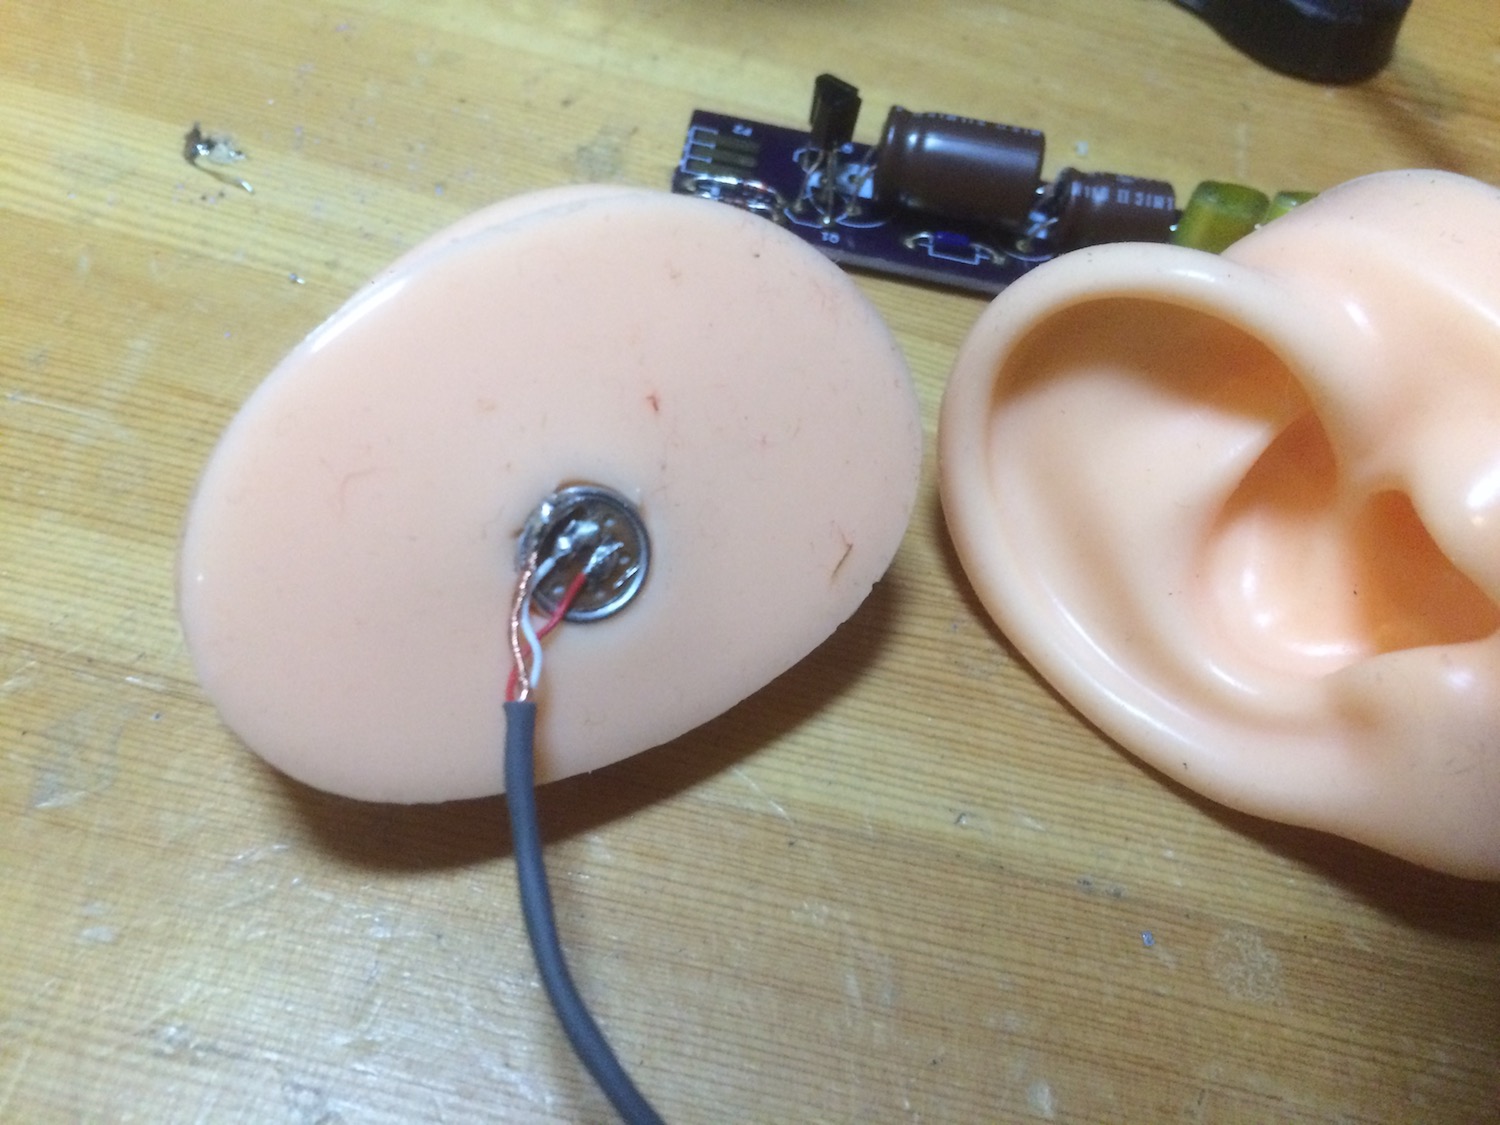
Here you can see the electret condenser mic element placed in the silicon ear just about where the eardrum would be. It’s possible to be even more precise – some people work out a kind of “ear canal” and attempt to get the mic even further along in it. For me the issue was the ears themselves (the pinnae) and the effect the shape would have on the directionality of the sound.
I followed the *SpHEAR design religiously. You can see in the picture above where I used the Linkwitz Modification, a way of tricking the cheap condenser mics into operating at higher SPL levels with a more even response.
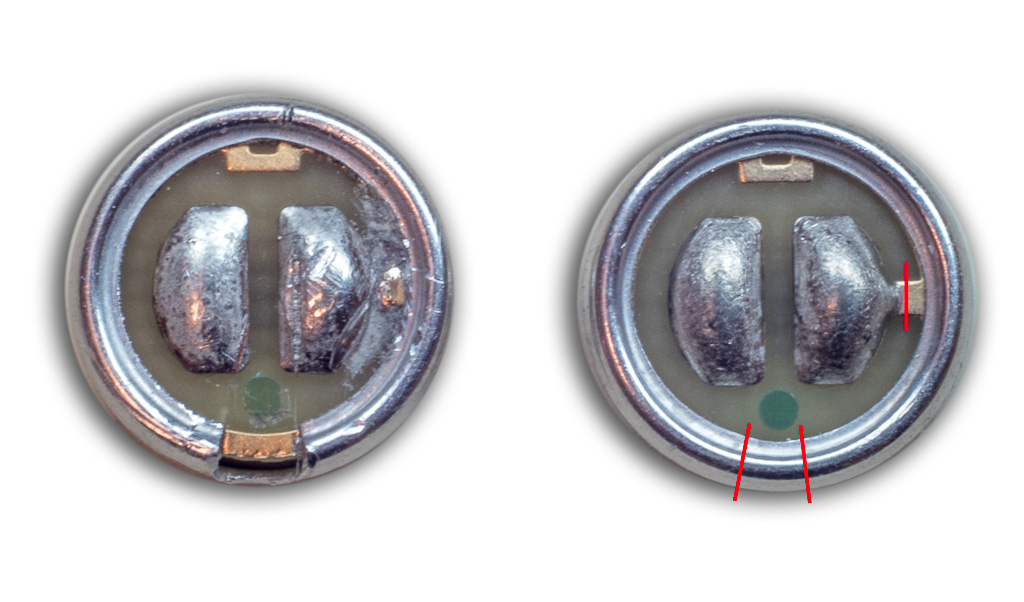
This picture, not mine, shows the mod itself, and you can read about it here if you like. It’s bascially making a two-lead mic element into a three lead element, and using that third lead to connect to the drain on a FET. Yes, I barely understood that, too, but finer minds than mine have given me a design that is quieter and more sensitive, so that’s what I like.
The *SpHEAR group also uses a very quiet preamp circuit based on an old Schoepps design. You can order PCB boards online to be printed and sent to you. Then you get the fun of soldering all the components in. Since they came in a pack of six and I only needed four for the *SpHEAR, I built these preamps as spares before realizing they could power a binaural head.
You will notice that I’m using a single cable of six-stringed wire with the blue/black and red/yellow leads to distinguish left from right. These terminate in XLR plugs, which connect to +48V phantom power from the recorder.

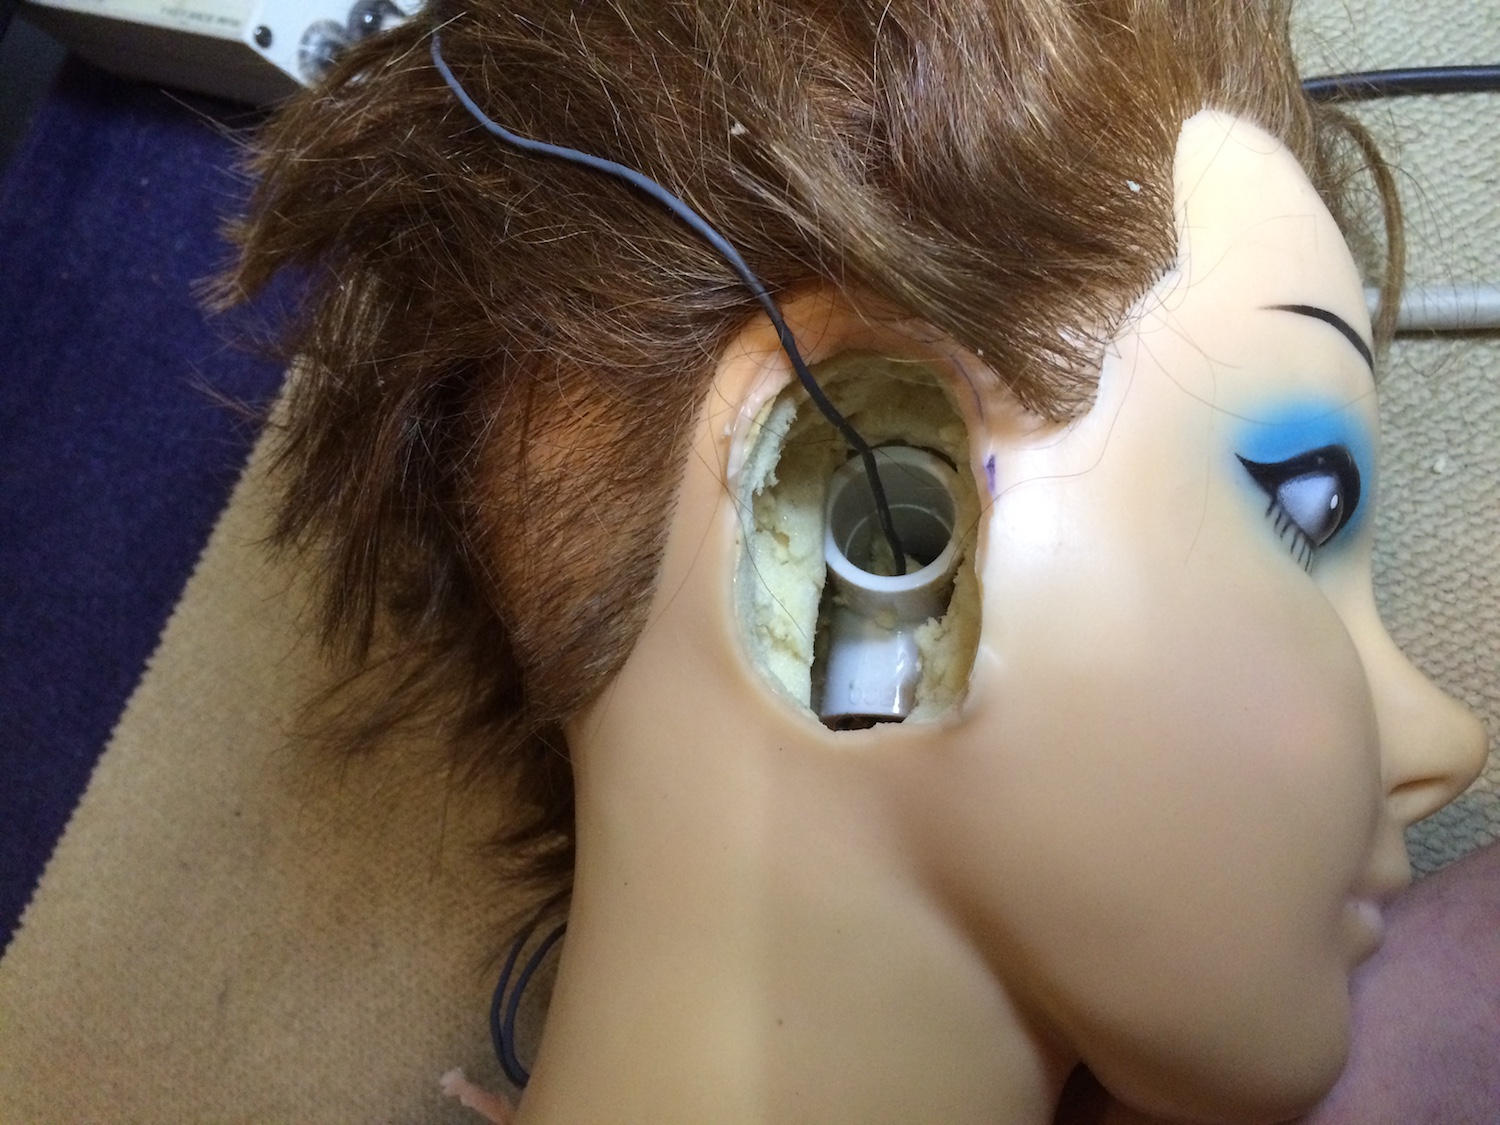
Here is the head from the side. I hollowed out the middle of the head and used PVC sprinkler tubing to make a casing to hold the preamps in the neck. This will be absolute hell to repair if I ever need to.
And here is the finished binaural head, in an old Arri camera case from WWII. The label on the outside says “Penanggalan,” which is the Malay vampire that detaches it’s head (and internal organs) at night and flies around looking for prey. With the XLRs dangling from the bottom, it seemed an apt description.
I tested and calibrated the Penanggalan, but put it aside when other, more pressing projects came around. It worked, and worked well, but I was waiting for the right use. Here it is being calibrated, set next to a reference mic. I recorded frequency sweeps and compared the two in software to see what adjustments I would have to make to get the best binaural effect.

Some time later, I realized that I could mount a couple cheap-o Chinese Action Cams to a pair of glasses, thus achieving the desired “Witness Head.”
Long ago I had purchased a few Eken H9 clones from an online Chinese supplier. I’m still unsure if they are proper H9s, and the H9 is a GoPro knockoff in the first place. So I could have knockoffs of the knockoff. They are no longer this cheap, but at the time they were as low as $20 apiece. That’s a bit insane. They appear to be every bit as good as a Go Pro. One of the ten I got had a bad display in back, something I didn’t really need in the first place.

Those are they, charging, mostly purchased for yet another project.
Next I had to work out how to affix them to the head. Ironically, I had once snitched a pair of plastic glasses from an actual 3D movie screening, so I knew they could be involved once I popped out the lenses. But I still had to work out a way to connect the cameras to the glasses.

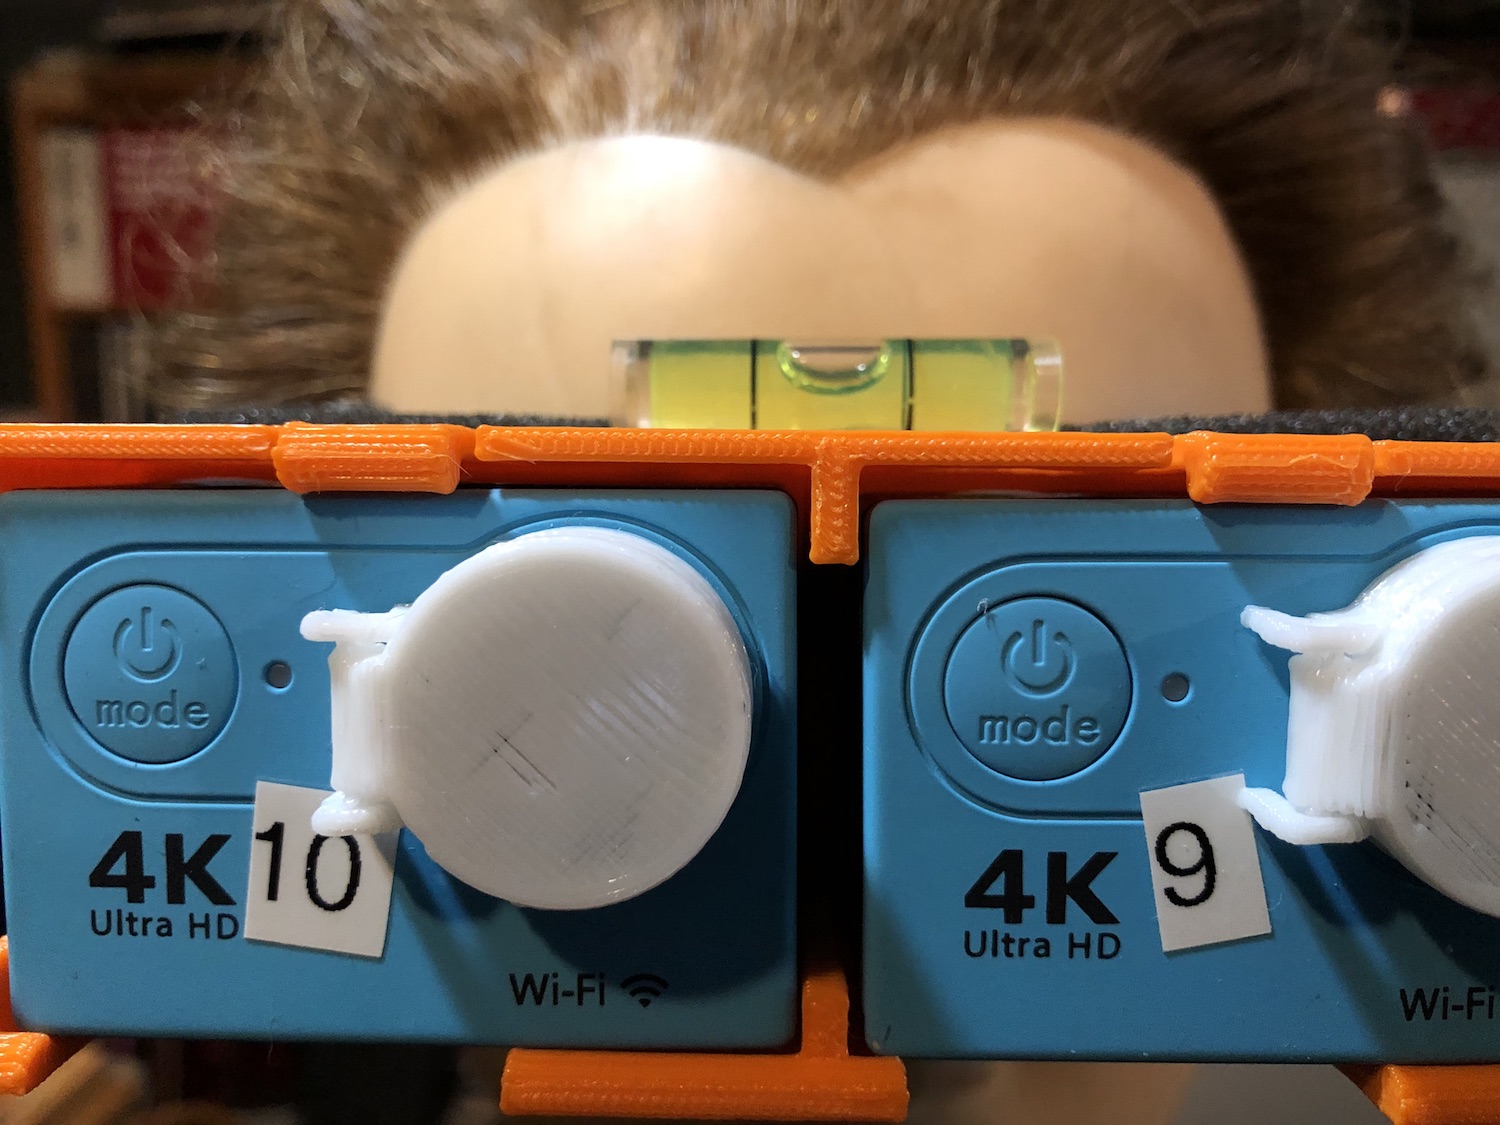
I used OpenSCAD to design a bracket for the cameras, and figure dI could use a 3D printer to make something to glue to the glasses. The tricky part was keeping an interaxial distance of 2.5″ – that means there should be 2.5″ between the centers of the lenses, just like the distance between most people’s eyes. The same way the Head would imitate the eardrums with plastic pinnae and mics set where the eardrums should be, the vision part of the Head would need cameras placed to that the lenses would correspond to where the eyes should be.
The OpenSCAD file is here and an STL is here if you are interested. I rotated it 90 degrees so it would print flat on my janky old 3D printer.
Here it is, printed out, with cameras inserted and frames attached:
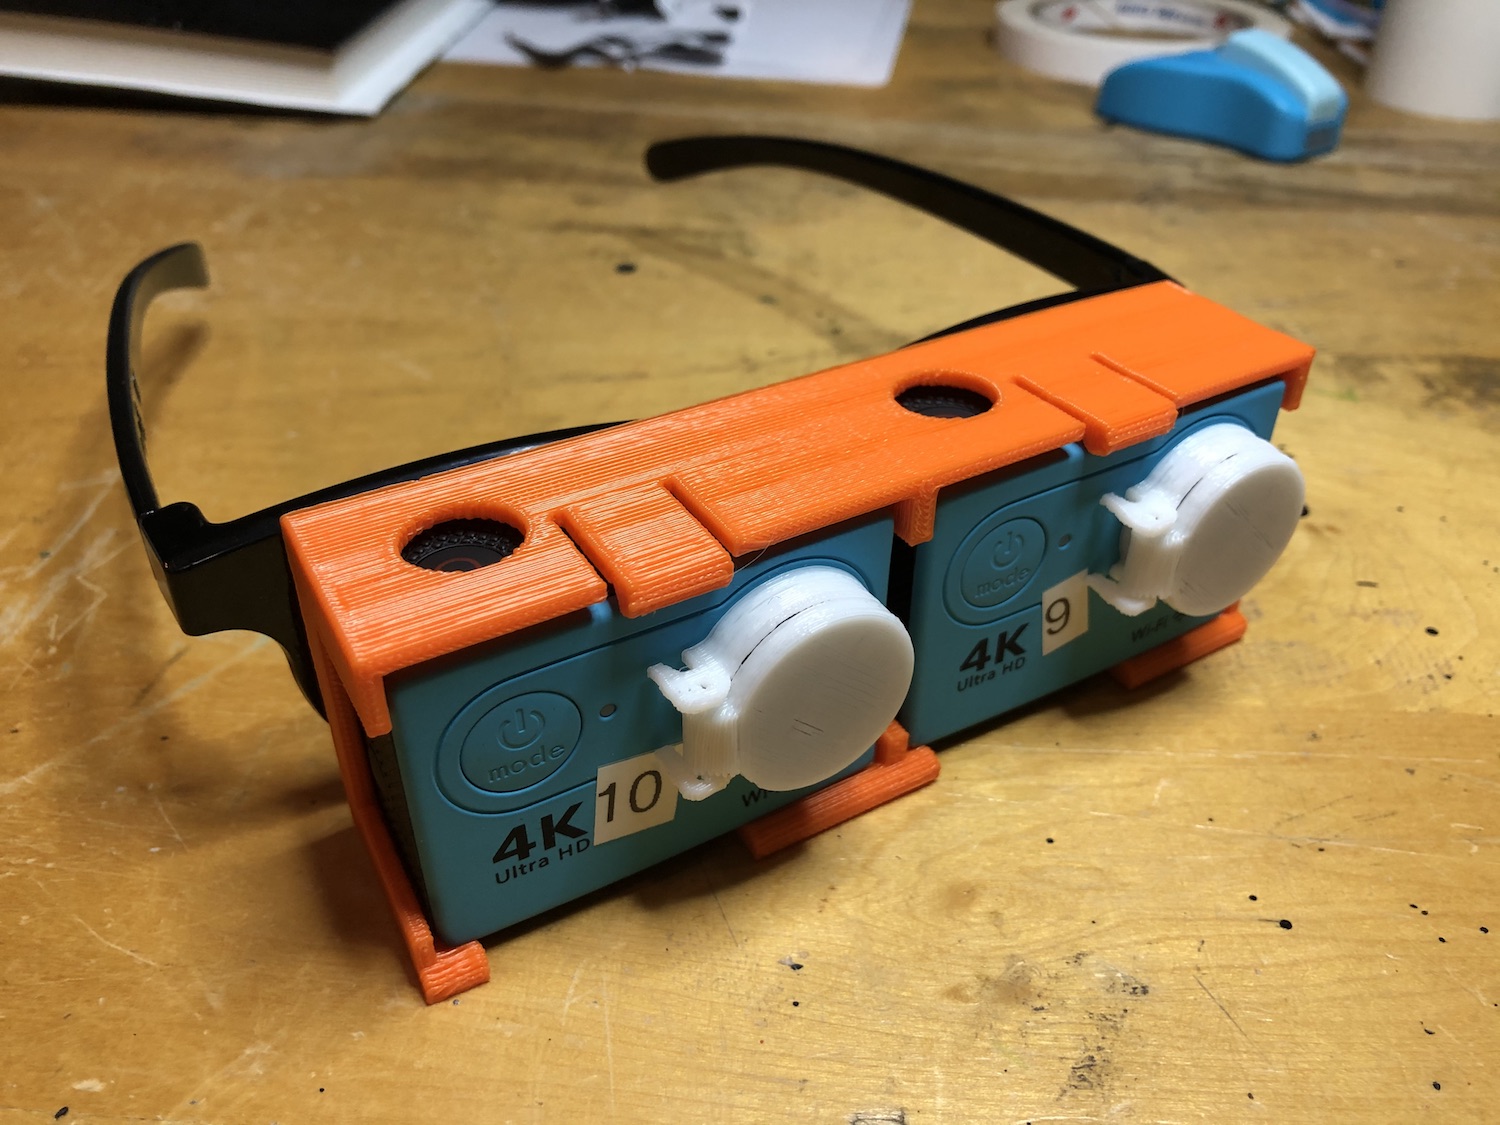
And ready to wear! I put an elastic band around the temples to hold it securely. And glued a hardware store level to the front so I could square it up on location. Those lens covers are also 3D printed – can’t remember where they came from, but I did not design them. How attractive these colors!
The procedure is not perfect by any means. I cannot really see what the head sees; I can only point it and hope the composition is tolerable. I can monitor the sound, so that helps. But initial tests were very positive, so I took the Head out for a few test runs.
I set the head on a mic stand (I had glued a mic stand screw thread into the neck) and the motion of the cable against the stand was noisy, but the vision held up and the binaural sound worked! It was good enough!
SO WHAT HAVE WE LEARNED?
Improvements for the future might include some way to monitor the output of the camera (the Eken H9 has a mini-HDMI out that would work). I’d like the composition to be a bit more rigorous. Securing the noisy cable would allow moving shots through areas, which is a different kind of project, but may also be interesting.
Placing the cameras on a kind of gimbal might smooth out movement if I were committed to the moving camera idea.
And on the post-production side of things, integrating this footage with generated 3D effects and animation would be quite simple – the next step would be to try it on a small subject.
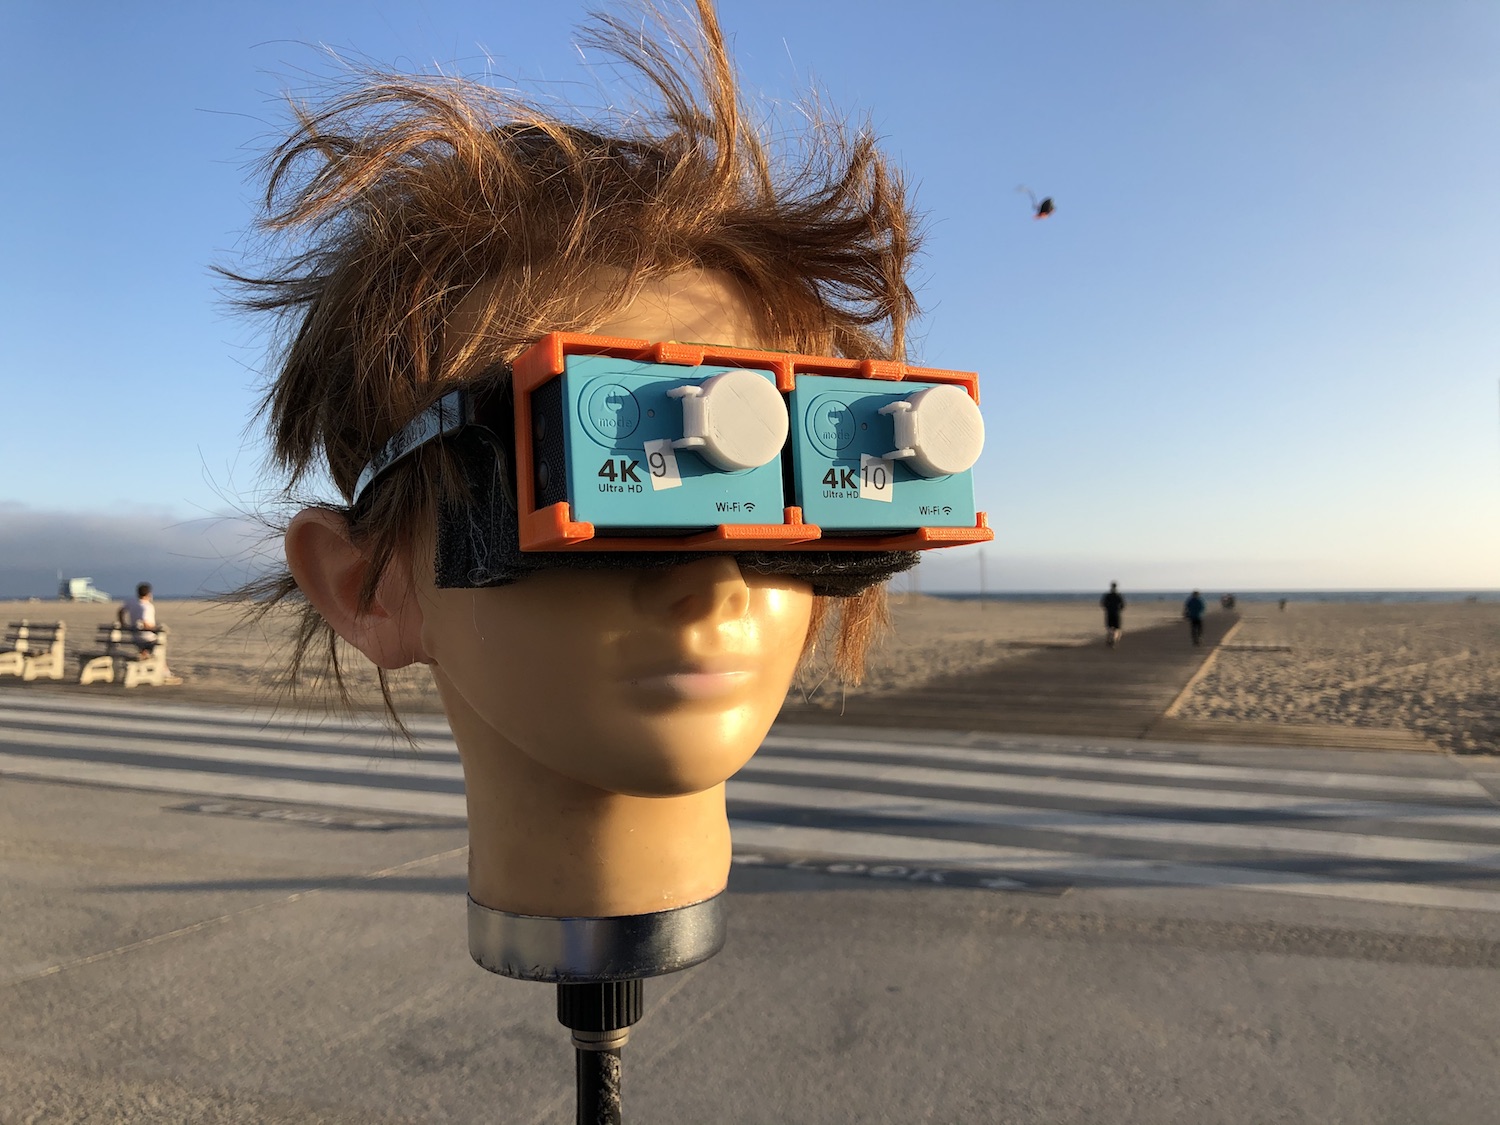
There she is! I’m quite pleased with her. I can only think that Wildman is looking down from his lofty afterlife perch, watching my progress. He must be thinking “What the hell! What are you doing with that?”
I tried to email your old email. I see you state no one uses it, (LOL), so I came here. U have been on my mind for whatever reason. I learned to follow up when that happens. I was trying to send you a couple of links I thought you would get a kick out of as well. May try FB at some point if I hear back from you.